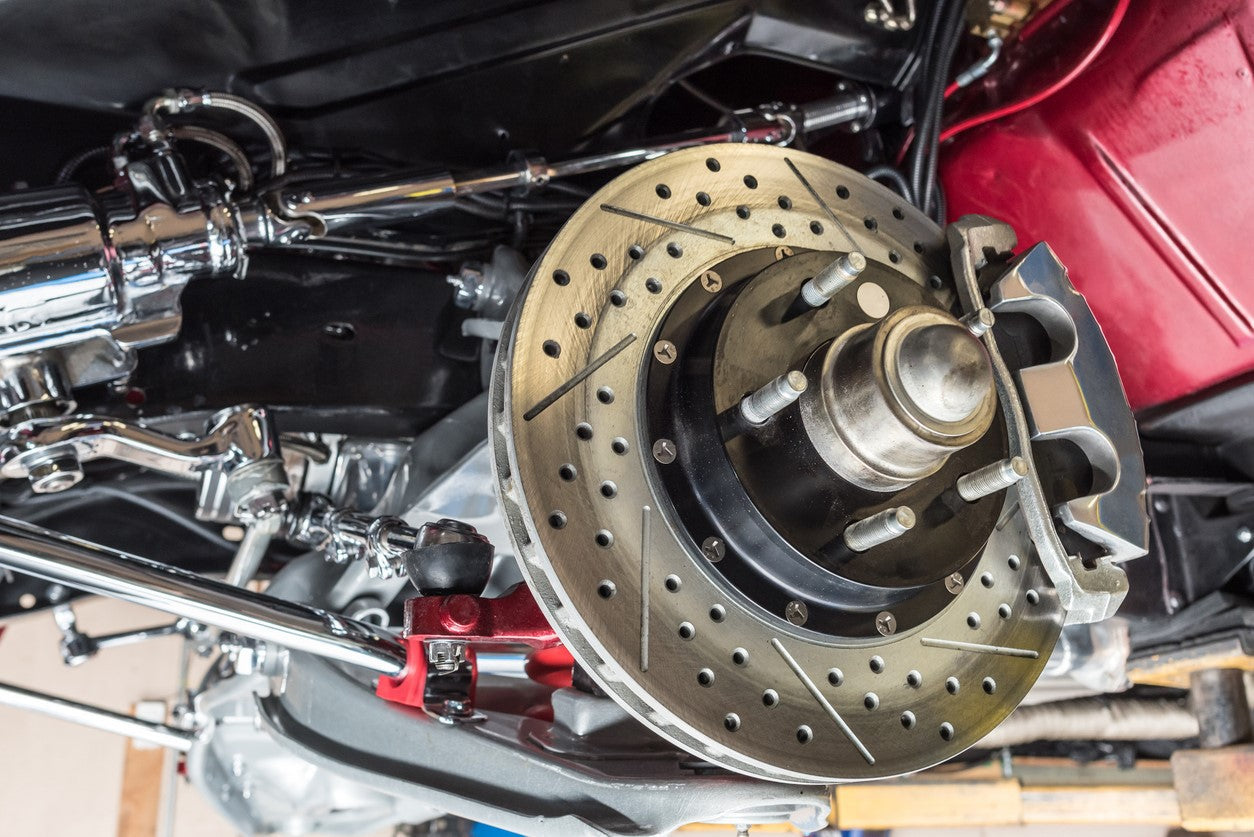
Modern disc brakes transform hot rod safety and performance. Converting from original drum brakes to disc brakes provides superior stopping power, better heat dissipation, reduced fade, and improved pedal feel. Understanding conversion options, components, and installation procedures helps you select the right brake system for your hot rod build.
In this guide, you'll learn:
- Why disc brakes outperform drum brakes for hot rods
- Front and rear conversion options and kits
- Component selection for different applications
- Installation procedures and considerations
- Master cylinder and brake line requirements
- Common conversion mistakes and solutions
Why Convert from Drum to Disc Brakes?
Quick Answer: Disc brakes provide 30-50% better stopping power, resist fade during repeated stops, dissipate heat more effectively, require less pedal effort, and maintain consistent performance in wet conditions. Modern disc brake conversions are essential for hot rods with increased performance, highway driving, and contemporary traffic conditions.
Drum Brake Limitations
Original Design Constraints:
- Designed for 1920s-1950s vehicles
- Adequate for 40-60 horsepower
- Light vehicle weights (2,000-3,000 lbs)
- Maximum speeds 50-60 mph
- Minimal traffic and stop-and-go driving
- Bias ply tires with limited grip
Performance Weaknesses:
- Heat buildup causes brake fade
- Self-energizing action creates grabby pedal feel
- Inconsistent stopping in wet conditions
- Difficult adjustment and maintenance
- Limited heat dissipation from enclosed design
- Rear brakes do majority of work (dangerous)
Modern Hot Rod Demands:
- 200-500+ horsepower common
- Vehicle weights 2,500-3,500+ lbs
- Highway speeds 65-80 mph
- Frequent stops in modern traffic
- Radial tires with high grip levels
- Driver and passenger safety expectations
Disc Brake Advantages
Stopping Power:
- 30-50% shorter stopping distances
- Higher clamping force from hydraulic advantage
- Larger swept area on rotor surface
- Better leverage from caliper design
- Consistent performance across temperature range
Heat Management:
- Open rotor design dissipates heat rapidly
- Vented rotors move air through cooling vanes
- Prevents fade during repeated stops
- Maintains performance on mountain descents
- Allows aggressive driving without brake loss
Wet Weather Performance:
- Caliper wipes water from rotor surface
- Pads make contact on both sides of rotor
- No water-filled drum reducing friction
- Consistent performance rain or shine
- Improved safety in all conditions
Maintenance Benefits:
- Visual pad inspection (no disassembly)
- Simple pad replacement procedure
- Self-adjusting operation (no manual adjustment)
- Longer service intervals
- Easier troubleshooting
Pedal Feel:
- Linear, progressive pedal response
- Consistent pedal height and travel
- No grabby or unpredictable behavior
- Better modulation for smooth stops
- Increased driver confidence
What Are Your Front Disc Brake Conversion Options?
Quick Answer: Front conversions include complete spindle swap kits (easiest installation), caliper bracket kits (use existing spindles), and custom fabrication (most complex). Most hot rodders choose complete spindle swap kits from Wilwood, SSBC, or CPP offering bolt-on installation with engineered components. Cost ranges $800-$2,500 depending on quality and features.
Complete Spindle Swap Kits
What's Included:
- New spindles with disc brake provisions
- Calipers (single or dual piston)
- Rotors (solid or vented)
- Caliper mounting brackets
- Brake pads
- Wheel bearings and seals
- Dust caps and hardware
- All necessary fasteners
Advantages:
- Bolt-on installation (no fabrication)
- Engineered and tested combinations
- All components included
- Proper brake balance designed in
- Technical support available
- Warranty coverage
Vehicle Applications:
- 1928-1948 Ford (straight axle)
- 1949-1954 Chevy (dropped axle)
- 1955-1957 Chevy (original spindles)
- Mustang II independent front suspension
- GM A-body and intermediate chassis
- Universal kits for custom applications
Cost Range:
- Budget kits: $800-$1,200
- Mid-range kits: $1,200-$1,800
- Premium kits: $1,800-$2,500
- Add $200-$400 for vented rotors
- Add $300-$600 for multi-piston calipers
Caliper Bracket Kits
What's Included:
- Caliper mounting brackets
- Calipers
- Rotors (machine to fit hub)
- Brake pads
- Hardware and fasteners
- Use existing spindles and hubs
Advantages:
- Lower cost than complete kits
- Retain original spindles
- Less extensive disassembly
- Works with rare or unique spindles
- Maintain original ride height
Disadvantages:
- May require machining rotors to hub
- Not all spindles have compatible kits
- Less technical support
- Potential fitment issues
- May require custom solutions
When to Use:
- Rare spindles without swap kits available
- Budget constraints (save $300-$600)
- Ride height concerns
- Existing spindles in excellent condition
- Custom or modified suspension
Custom Fabrication
Components Needed:
- Generic calipers (Wilwood, SSBC)
- Custom mounting brackets
- Rotors machined for hub
- Caliper positioning calculations
- Extensive fabrication skills
Advantages:
- Complete customization
- Works with any spindle
- Optimize for specific application
- Choose exact components wanted
- Maximum flexibility
Disadvantages:
- Requires advanced fabrication skills
- Time-intensive engineering and building
- Potential geometry problems
- No technical support or warranty
- Trial and error fitting
When to Use:
- Extremely rare or custom spindles
- Unique suspension geometry
- Racing applications needing specific calipers
- Fabricator with expertise
- No kit available for application
What Are Your Rear Disc Brake Conversion Options?
Quick Answer: Rear conversions include complete axle assemblies (easiest), bolt-on caliper kits for existing axles (most common), and parking brake integrated systems (best functionality). Most hot rodders use bolt-on kits for Ford 9-inch, GM 10-bolt, or other popular rear ends. Cost ranges $600-$1,800 depending on axle type and parking brake requirements.
Complete Rear Axle Assemblies
What's Included:
- Complete rear axle housing
- Disc brake provisions built in
- Calipers and rotors installed
- Parking brake system integrated
- Axle shafts and bearings
- Center section with gears
- Ready to bolt under vehicle
Advantages:
- Everything included and assembled
- Proper gear ratio selection
- Parking brake functionality
- No existing axle modification
- Bolt-in installation
- Modern bearing and seal design
Disadvantages:
- Highest cost option ($2,500-$5,000+)
- Must match width to vehicle
- May require suspension modifications
- Gear ratio and differential selection
- Shipping costs for complete axle
When to Consider:
- Starting from scratch (no existing axle)
- Existing axle worn or damaged
- Want complete modern package
- Need specific gear ratio or differential
- Building pro-touring performance hot rod
Bolt-On Caliper Kits
What's Included:
- Caliper mounting brackets
- Calipers
- Rotors
- Brake pads
- Emergency brake cables (if applicable)
- Hardware and fasteners
- Use existing axle housing and shafts
Advantages:
- Moderate cost ($600-$1,200)
- Retain existing axle and gears
- Bolt-on installation (minimal fabrication)
- Available for popular rear ends
- Maintain current width and suspension
Popular Applications:
- Ford 9-inch rear end (most common)
- GM 10-bolt and 12-bolt
- Mopar 8-3/4 inch rear end
- Toyota rear ends
- Jaguar independent rear suspension
Considerations:
- Axle flanges must be correct type
- Some require axle shaft modification
- Parking brake may be separate drum
- Bearing retainer type compatibility
- Wheel offset and clearance
Parking Brake Options
Integrated Parking Brake Calipers:
- Parking brake built into rear caliper
- Cable-actuated mechanical system
- Clean installation (no separate drum)
- Higher cost ($1,200-$1,800)
- Best appearance and function
Separate Drum Parking Brake:
- Small drum inside rear rotor hat
- Traditional emergency brake operation
- Lower cost than integrated calipers
- More complex installation
- Additional maintenance
No Parking Brake:
- Calipers without parking brake provision
- Lowest cost option
- Not legal in most jurisdictions
- Requires transmission park or chocks
- Not recommended for street use
How Do You Select the Right Master Cylinder?
Quick Answer: Master cylinder bore size determines pedal effort and brake balance. Disc brakes require smaller bore (7/8 to 1 inch) than drums for proper pedal feel. Use dual-reservoir master cylinder for safety, power brake booster for reduced pedal effort, and proportioning valve for front-to-rear brake balance.
Master Cylinder Bore Size
Understanding Bore Size:
- Larger bore moves more fluid (less pedal travel)
- Smaller bore creates more pressure (less pedal effort)
- Disc brakes need higher pressure than drums
- Smaller bore compensates for disc brake requirements
- Balance between effort and travel distance
Recommended Bore Sizes:
Manual Brakes (no booster):
- Four-wheel disc: 7/8 inch bore
- Front disc, rear drum: 15/16 inch bore
- Provides manageable pedal effort
- Adequate travel for brake engagement
Power Brakes (with booster):
- Four-wheel disc: 1 inch to 1-1/8 inch bore
- Front disc, rear drum: 1 inch bore
- Booster reduces effort requirement
- Larger bore reduces pedal travel
Common Mistakes:
- Using drum brake master (too large bore)
- Excessive pedal effort from wrong bore
- Pedal travel to floor (bore too small)
- Not matching to brake type (disc vs drum)
Dual vs Single Reservoir
Dual Reservoir (Required):
- Separate front and rear circuits
- One circuit failure doesn't lose all brakes
- Required by DOT standards (1968+)
- Safety critical for modern hot rods
- Industry standard for disc conversions
Single Reservoir (Obsolete):
- Single circuit for all brakes
- One leak loses all braking
- Unsafe for modern traffic
- Only acceptable for show cars (not driven)
- Should be replaced with dual system
Power Brake Boosters
Vacuum Booster:
- Uses engine vacuum for assist
- Reduces pedal effort 50-70%
- Standard on modern vehicles
- Available in 7, 8, or 9 inch diameter
- Requires 15+ inches vacuum for operation
Hydro-Boost:
- Uses power steering pump pressure
- Works with low-vacuum engines (big cams)
- Consistent assist independent of vacuum
- More expensive than vacuum booster
- Requires power steering system
Manual Brakes:
- No booster assistance
- Higher pedal effort required
- Acceptable with proper master cylinder sizing
- Traditional hot rod feel
- Simplifies installation (no booster needed)
What About Proportioning Valves?
Quick Answer: Proportioning valve limits rear brake pressure preventing premature rear wheel lockup. Essential for front disc, rear drum combinations. Adjustable proportioning valve allows tuning brake balance for weight distribution and driving conditions. Install in rear brake line after master cylinder split.
Understanding Proportioning
Why Proportioning Needed:
- Weight transfers forward during braking
- Front brakes should engage first and stronger
- Rear brakes need less pressure to prevent lockup
- Disc brakes require higher pressure than drums
- Improper balance causes skids or poor stopping
Front Disc, Rear Drum:
- Disc brakes need 800-1,200 PSI
- Drum brakes need 300-600 PSI
- Proportioning valve reduces rear pressure
- Prevents rear wheel lockup
- Improves straight-line braking stability
Four-Wheel Disc:
- Front and rear both need higher pressure
- Less proportioning reduction needed
- Adjustable valve allows fine-tuning
- Can adjust for weight distribution
- Compensates for loading conditions
Proportioning Valve Types
Fixed Proportioning Valve:
- Pre-set reduction ratio (typically 57%)
- No adjustment possible
- Works for most street applications
- Lower cost ($30-$60)
- Simple installation
Adjustable Proportioning Valve:
- Dial or knob adjustment
- Tune brake balance for application
- Compensate for weight changes
- Optimize for tire compound
- Higher cost ($80-$150)
Combination Valve:
- Proportioning plus residual pressure
- Metering valve for front discs
- Warning light switch
- All functions in one unit
- Cost $100-$200
Installation Location
Where to Install:
- In rear brake line after master cylinder
- After master cylinder split point
- Before rear brake hose junction
- Accessible location for adjustment
- Protected from road debris and damage
Brake Line Plumbing:
- Master cylinder to proportioning valve
- Proportioning valve to rear brake distribution
- Front brakes direct from master cylinder
- Use proper brake line size (3/16 inch typical)
- Double flare all connections
What Are the Installation Steps?
Quick Answer: Installation involves removing old drum brake components, installing new spindles or caliper brackets, mounting calipers and rotors, plumbing brake lines, installing master cylinder and proportioning valve, bleeding system, and testing. Allow 8-16 hours for front conversion, 6-12 hours for rear. Follow kit instructions precisely for safety.
Front Disc Brake Installation
Step 1: Remove Drum Brake Components
- Jack vehicle and support on stands
- Remove wheels and tires
- Remove brake drums
- Disconnect brake lines
- Remove backing plates and hardware
- Remove old spindles (if replacing)
- Clean mounting surfaces thoroughly
Step 2: Install New Spindles or Brackets
- Install new disc brake spindles with gaskets
- Torque king pin bushings or ball joints to spec
- Or install caliper brackets on existing spindles
- Ensure proper alignment and clearances
- Use thread locker on critical fasteners
Step 3: Install Bearings and Rotors
- Pack wheel bearings with high-temp grease
- Install inner bearing and seal in rotor
- Slide rotor onto spindle
- Install outer bearing and castle nut
- Adjust bearing preload (no play, slight drag)
- Install cotter pin and dust cap
Step 4: Mount Calipers
- Install caliper brackets with proper spacers
- Torque bracket bolts to specification
- Install brake pads in caliper or bracket
- Slide caliper over rotor
- Install caliper mounting bolts and torque
- Verify rotor spins freely without drag
Step 5: Connect Brake Lines
- Install new hard lines or adapt existing
- Use proper double-flare fittings
- Install flexible brake hoses to calipers
- Route lines away from suspension travel
- Secure lines with clips and brackets
- Check clearances through full suspension travel
Rear Disc Brake Installation
Step 1: Remove Drum Brake Components
- Jack rear end and support on stands
- Remove wheels and drums
- Disconnect brake lines and cables
- Remove axle shafts (if required by kit)
- Remove backing plates
- Clean axle flanges and housing ends
Step 2: Prepare Axle for Disc Brakes
- Install new axle bearings and seals (if required)
- Install axle shafts with proper preload
- Or use existing shafts if compatible
- Verify axle flange type matches kit
- Check axle endplay specifications
Step 3: Install Caliper Brackets and Rotors
- Install caliper mounting brackets on housing
- Position brackets per kit instructions
- Torque bracket bolts to specification
- Install rotors on axle flanges
- Use thread locker on rotor mounting bolts
- Verify rotor runout within spec (.005 inch typical)
Step 4: Install Calipers
- Install brake pads in caliper
- Mount caliper over rotor
- Install and torque caliper bolts
- Connect parking brake cables (if applicable)
- Adjust parking brake per instructions
- Check clearances and operation
Step 5: Connect Brake Lines
- Route hard lines to rear axle
- Install through proportioning valve
- Connect flexible hoses to calipers
- Secure lines away from driveshaft and suspension
- Use proper clips and supports
- Verify no interference during axle movement
Master Cylinder Installation
Step 1: Remove Old Master Cylinder
- Disconnect brake lines (prepare to catch fluid)
- Remove master cylinder mounting nuts
- Remove from firewall or booster
- Clean mounting surface
- Inspect mounting studs
Step 2: Install New Master Cylinder
- Bench bleed master cylinder before installation
- Install gasket or seal on mounting surface
- Position master cylinder on studs
- Install mounting nuts and torque to spec
- Connect pushrod to brake pedal
- Adjust pedal height if necessary
Step 3: Connect Brake Lines
- Install brake lines to master cylinder ports
- Front circuit to front brakes
- Rear circuit through proportioning valve
- Use proper thread sealant (not Teflon tape)
- Torque fittings to specification
- Check for leaks at connections
How Do You Bleed the Brake System?
Quick Answer: Bleeding removes air from hydraulic system ensuring firm pedal and proper brake function. Start at wheel farthest from master cylinder, work toward closest. Use helper to pump pedal or vacuum/pressure bleeding equipment. Continue until fluid runs clear with no air bubbles. Recheck pedal firmness and top off reservoir.
Manual Bleeding Procedure
Preparation:
- Fill master cylinder reservoir completely
- Keep reservoir filled throughout process
- Use only fresh DOT 3 or DOT 4 fluid
- Never reuse old brake fluid
- Have helper available for pedal pumping
Bleeding Sequence:
- Right rear (farthest from master cylinder)
- Left rear
- Right front
- Left front (closest to master cylinder)
- Or follow kit manufacturer recommendation
Bleeding Steps:
- Attach clear hose to bleeder valve
- Submerge hose end in container with fluid
- Helper pumps brake pedal 3-5 times
- Helper holds pedal down
- Open bleeder valve (fluid and air escape)
- Close bleeder valve before pedal reaches floor
- Helper releases pedal slowly
- Repeat until no air bubbles in hose
- Move to next wheel
- Top off master cylinder after each wheel
Critical Points:
- Never let pedal go to floor with bleeder open
- Close bleeder before releasing pedal
- Keep master cylinder reservoir full
- Watch for air bubbles in clear hose
- May require 10-20 pumps per wheel
Vacuum Bleeding
Equipment:
- Vacuum bleeder pump (hand or powered)
- Clear hose and collection bottle
- One-person operation
Procedure:
- Connect vacuum pump to bleeder valve
- Apply vacuum (15-20 inches Hg)
- Open bleeder valve
- Watch fluid flow into collection bottle
- Close valve when bubble-free
- Repeat at each wheel
- Top off master cylinder frequently
Advantages:
- One-person operation
- Faster than manual bleeding
- Can pull stubborn air bubbles
- Works well on ABS systems
Pressure Bleeding
Equipment:
- Pressure bleeder tank
- Adapter for master cylinder
- Shop air supply (regulated to 15-20 PSI)
Procedure:
- Fill pressure bleeder with fresh fluid
- Connect adapter to master cylinder
- Pressurize system to 15-20 PSI
- Open bleeder valves in sequence
- Close when bubble-free fluid flows
- Monitor pressure throughout
- No pedal pumping required
Advantages:
- Fastest bleeding method
- Maintains constant pressure
- Professional quality results
- Prevents air introduction from pumping
Post-Bleeding Checks
Verify Proper Bleeding:
- Firm, high brake pedal
- Pedal doesn't sink when held
- Equal braking all wheels
- No spongy or soft pedal feel
- Parking brake holds (rear disc with integrated parking brake)
If Problems Persist:
- Rebleed system starting over
- Check for air leaks at fittings
- Verify master cylinder bench bled properly
- Inspect for damaged brake lines
- Check caliper bleeder valves functioning
What Are Common Conversion Mistakes?
Quick Answer: Common mistakes include wrong master cylinder bore size, skipping proportioning valve, improper bleeding technique, using incorrect brake fluid, mixing old and new components, inadequate brake line support, and not testing thoroughly before driving. These mistakes create poor brake performance, safety hazards, and system failures.
Component Selection Mistakes
1. Wrong Master Cylinder Bore Size
- Using old drum brake master (too large)
- Excessive pedal effort with manual brakes
- Pedal travel too short or too long
- Poor brake balance and feel
- Choose correct bore for brake type
2. Skipping Proportioning Valve
- Rear wheels lock prematurely
- Poor stopping performance
- Unstable braking (skidding rear)
- Dangerous in wet or loose conditions
- Always use proportioning valve for disc/drum combo
3. Mismatched Components
- Front kit from one manufacturer, rear from another
- Incompatible hydraulic pressures
- Brake imbalance and poor performance
- Difficult troubleshooting
- Use matched components when possible
4. Undersized Brake System
- Small rotors for heavy vehicle
- Single-piston calipers on high-power hot rod
- Inadequate cooling for intended use
- Brake fade and poor performance
- Match brake system to vehicle weight and power
Installation Mistakes
5. Improper Brake Line Routing
- Lines rubbing on suspension or tires
- Inadequate clearance during travel
- Lines too close to heat sources
- Chafing through and brake failure
- Secure lines with proper clips and supports
6. Incorrect Brake Line Flares
- Using single flare instead of double flare
- Improper flaring tool technique
- Leaks at fittings under pressure
- Loss of brakes and safety hazard
- Always use double flare for brake lines
7. Reusing Old Flexible Hoses
- Old hoses deteriorate internally
- Can collapse and restrict flow
- May burst under pressure
- Replace all flexible hoses during conversion
- Use DOT-approved brake hoses only
8. Not Using Thread Sealant
- Brake fluid leaks at pipe thread fittings
- Loss of fluid and air introduction
- Use proper thread sealant (not Teflon tape)
- Check all connections for leaks
- Retorque after initial test drive
Bleeding and Testing Mistakes
9. Inadequate Bleeding
- Air remains in system
- Soft, spongy pedal
- Poor brake performance
- Continue bleeding until firm pedal
- Check all calipers thoroughly
10. Wrong Brake Fluid Type
- Using DOT 5 silicone fluid with DOT 3/4 system
- Fluids not compatible (causes swelling)
- System failure and safety hazard
- Use fluid specified by component manufacturer
- Never mix different fluid types
11. Not Adjusting Parking Brake
- Parking brake ineffective
- Excessive cable travel
- Rear pads not positioned properly
- Follow adjustment procedure in kit instructions
- Test parking brake on hill
12. Insufficient Testing Before Use
- Driving without bed-in procedure
- Not checking for leaks
- Inadequate function testing
- Test in safe area at low speeds first
- Verify straight-line stops and equal braking
Maintenance Mistakes
13. Ignoring Rotor Runout
- Excessive runout causes pedal pulsation
- Uneven pad wear
- Poor brake feel
- Check runout with dial indicator (.005 inch max)
- Machine or replace rotors if excessive
14. Using Incorrect Brake Pads
- Wrong pad compound for application
- Excessive noise or dust
- Poor performance or brake fade
- Match pad compound to driving style
- Street, performance, or racing specific
How Much Does a Disc Brake Conversion Cost?
Quick Answer: Front disc brake conversion costs $800-$2,500 for parts depending on quality and features. Rear conversion costs $600-$1,800. Add master cylinder ($80-$200), proportioning valve ($30-$150), brake lines ($100-$300), and fluid ($20-$40). Total four-wheel conversion runs $1,600-$5,000 in parts. Professional installation adds $800-$2,000 labor.
Front Disc Brake Conversion Costs
Budget Front Kits ($800-$1,200):
- Single-piston calipers
- Solid rotors (not vented)
- Basic spindles or brackets
- Standard brake pads
- All necessary hardware
- Works fine for street cruising
- Adequate for moderate power
Mid-Range Front Kits ($1,200-$1,800):
- Dual-piston calipers
- Vented rotors
- Quality spindles
- Performance brake pads
- Better heat dissipation
- Improved stopping power
- Good for street/strip use
Premium Front Kits ($1,800-$2,500):
- Multi-piston calipers (4 or 6 piston)
- Large diameter vented rotors
- Forged or billet components
- High-performance pads
- Lightweight design
- Race-quality components
- Pro-touring or serious performance
Rear Disc Brake Conversion Costs
Bolt-On Rear Kits ($600-$1,000):
- Basic single-piston calipers
- Solid rotors
- Caliper brackets for existing axle
- No parking brake integration
- Works for most street applications
Mid-Range Rear Kits ($1,000-$1,400):
- Better quality calipers
- Vented rotors (some applications)
- Parking brake integration
- Complete hardware
- Better longevity and performance
Premium Rear Kits ($1,400-$1,800):
- Multi-piston calipers
- Large diameter rotors
- Integrated parking brake
- Billet or forged components
- Pro-touring quality
Complete Rear Axle ($2,500-$5,000+):
- New axle housing with disc brakes
- Choice of gear ratio
- Differential type selection
- Everything included and assembled
- Most expensive but comprehensive
Supporting Components
Master Cylinder:
- Basic dual reservoir: $80-$150
- With power brake booster: $150-$300
- High-performance: $200-$400
Proportioning Valve:
- Fixed ratio: $30-$60
- Adjustable: $80-$150
- Combination valve: $100-$200
Brake Lines:
- Hard line kit (all four corners): $100-$200
- Stainless braided hoses (set of 4): $80-$150
- Custom lines and fittings: $150-$300
Brake Fluid:
- DOT 3 or DOT 4 (1 quart): $8-$15
- High-performance fluid: $15-$25
- Need 2-3 quarts for complete system
Installation Supplies:
- Thread sealant: $5-$10
- Brake cleaner: $5-$10
- Anti-seize compound: $8-$15
- Misc hardware and zip ties: $20-$40
Professional Installation Costs
Front Disc Brake Installation:
- Labor: $400-$800
- Time: 4-8 hours
- Includes bleeding and adjustment
- Testing and road test
Rear Disc Brake Installation:
- Labor: $400-$1,200
- Time: 4-8 hours (simple kit)
- Time: 8-12 hours (complete axle)
- Includes axle work if needed
Complete Four-Wheel Conversion:
- Labor: $800-$2,000
- Time: 10-20 hours
- Includes master cylinder and lines
- Complete system bleeding and testing
- Road test and adjustments
Do You Need Power Brakes?
Quick Answer: Power brakes reduce pedal effort 50-70% and recommended for most hot rods especially with four-wheel disc brakes. Manual brakes acceptable with proper master cylinder sizing (7/8 inch bore) but require more leg strength. Power brakes improve driver comfort, easier modulation, and better for less experienced drivers.
When Power Brakes Recommended
Situations Requiring Power Brakes:
- Four-wheel disc brake conversions
- Heavy vehicles (3,500+ lbs)
- Drivers with less leg strength
- High-performance applications (frequent hard stops)
- Modern traffic driving conditions
- Shared vehicle (multiple drivers)
Benefits of Power Assist:
- Easier pedal effort (50-70% reduction)
- Less driver fatigue in traffic
- Smoother brake modulation
- Quicker reaction time (less leg movement)
- More accessible to all drivers
- Modern feel and function
When Manual Brakes Acceptable
Situations for Manual Brakes:
- Lightweight vehicles (under 2,500 lbs)
- Front disc, rear drum conversions
- Traditional hot rod purists
- Strong, experienced drivers
- Proper master cylinder sizing (7/8 inch)
- Minimal traffic driving
Manual Brake Considerations:
- Higher pedal effort required
- More leg strength needed
- Traditional hot rod feel
- Simpler installation (no booster)
- Less underhood clutter
- One less system to maintain
Power Brake Options
Vacuum Booster:
- Uses engine vacuum for assist
- Most common power brake type
- Available 7, 8, or 9 inch diameter
- Requires 15+ inches vacuum
- Won't work with aggressive camshafts
- Cost: $150-$300
Hydro-Boost:
- Uses power steering pump pressure
- Works with low-vacuum engines
- Consistent assist regardless of vacuum
- Requires power steering system
- More expensive and complex
- Cost: $400-$800
Electric Vacuum Pump:
- Supplements engine vacuum
- Works with low-vacuum engines
- Allows vacuum booster use
- Added complexity and cost
- Requires electrical connection
- Cost: $200-$400 plus booster
What Maintenance Do Disc Brakes Require?
Quick Answer: Disc brakes require visual pad inspection every 6 months, pad replacement at 3mm thickness, rotor inspection for scoring or warping, caliper cleaning and lubrication, brake fluid flush every 2 years, and regular cleaning to remove brake dust. Proper maintenance ensures consistent performance and extends component life.
Regular Inspection Schedule
Every 6 Months or 5,000 Miles:
- Visual pad thickness check through caliper
- Look for uneven wear patterns
- Check rotor surface for scoring
- Inspect brake lines for leaks or damage
- Check flexible hoses for cracks
- Verify no fluid leaks at connections
Annual Inspection:
- Remove wheels for closer inspection
- Measure pad thickness with caliper
- Check rotor thickness and runout
- Inspect caliper slide pins and boots
- Check parking brake operation
- Test brake pedal feel and travel
Every 2 Years:
- Complete brake fluid flush and replacement
- Inspect all brake lines and fittings
- Check proportioning valve function
- Lubricate caliper slide pins
- Clean and inspect calipers
- Replace flexible brake hoses (if aged)
Pad Replacement
When to Replace:
- Pad thickness 3mm or less
- Uneven wear across pad
- Squealing or grinding noises
- Reduced braking performance
- Pedal pulsation during braking
Replacement Procedure:
- Remove wheel and tire
- Remove caliper bolts
- Hang caliper with wire (don't hang by hose)
- Remove old pads
- Inspect rotor and caliper
- Compress caliper pistons
- Install new pads
- Reinstall caliper and torque bolts
- Pump pedal to seat pads
- Bed in new pads (30-50 moderate stops)
Rotor Service
Inspection Points:
- Minimum thickness specification (stamped on rotor)
- Surface scoring or grooving
- Runout (wobble when spinning)
- Cracks or heat checking
- Rust or corrosion (surface rust normal)
When to Machine Rotors:
- Light scoring or grooves
- Slight runout causing pulsation
- Uneven pad wear pattern
- Above minimum thickness after machining
- During pad replacement for best results
When to Replace Rotors:
- Below minimum thickness
- Severe scoring or grooving
- Cracks or heat damage
- Excessive runout cannot be machined out
- Warped beyond repair
Brake Fluid Maintenance
Why Fluid Replacement Important:
- Brake fluid absorbs moisture over time
- Moisture lowers boiling point
- Causes brake fade and corrosion
- Old fluid can cause caliper failures
- Fresh fluid maintains performance
Fluid Flush Procedure:
- Use only DOT 3 or DOT 4 (match original)
- Never mix DOT 5 with DOT 3/4
- Extract old fluid from reservoir
- Fill with fresh fluid
- Bleed system at all four wheels
- Continue until fluid runs clean
- Check for leaks after flush
Frequently Asked Questions
Can I convert just the front brakes to disc?
Yes, and it's very common. Front brakes provide 60-70% of total braking force, so front disc conversion delivers most of the benefit. Many hot rodders run front disc, rear drum combination successfully. Requires proportioning valve to balance front disc and rear drum pressures. Budget-friendly approach providing major improvement over all-drum brakes.
Will disc brakes fit with my stock wheels?
Depends on wheel size and offset. Most disc brake kits require 15-inch or larger wheels for caliper clearance. Some low-profile kits fit 14-inch wheels. Check kit specifications for minimum wheel size and offset requirements. May need to test fit or use templates before committing to kit. Aftermarket wheels often provide better clearance than stock wheels.
Do I need to upgrade my rear axle?
Not usually, unless axle damaged or inadequate. Most bolt-on rear disc kits work with existing Ford 9-inch, GM 10-bolt, Mopar 8-3/4, and other popular rear ends. Requires proper axle flange type (bolt-on, C-clip, or pressed). Check kit compatibility with your specific rear end before ordering. Only need new axle if building from scratch or existing axle worn out.
Can I use DOT 5 silicone brake fluid?
Not recommended for most hot rods. DOT 5 silicone fluid doesn't absorb water but also doesn't mix with DOT 3/4. Creates problems with proportioning valves and ABS systems. Use DOT 3 or DOT 4 glycol-based fluid for disc brake conversions. DOT 5.1 acceptable (not same as DOT 5). Stick with manufacturer recommendations.
How long do disc brake pads last?
10,000-40,000 miles depending on driving style and pad compound. Aggressive driving, frequent stops, and performance pads wear faster. Cruising and gentle braking extends pad life. Street compound pads typically last 20,000-30,000 miles. Inspect pads regularly and replace at 3mm thickness. Driving habits affect life more than pad quality.
Do I need vented rotors?
Recommended for frequent stops or performance driving. Vented rotors dissipate heat better than solid rotors, reducing brake fade. Essential for pro-touring builds, mountain driving, or high-performance use. Solid rotors adequate for light vehicles, cruising, or budget builds. Vented rotors cost $50-$100 more per axle but provide significant heat management benefit.
Can I paint my brake calipers?
Yes, using proper high-temperature paint. Caliper paint withstands 500°F+ heat. Clean calipers thoroughly, mask brake components, and apply multiple thin coats. Popular for custom appearance and color coordination. Use quality brake caliper paint designed for high heat. Don't paint rotor surface or pad contact areas. Allow proper curing time before operation.
Why is my brake pedal soft?
Most common cause is air in brake lines. Rebleed system completely, checking all calipers. Could also be leaking caliper or wheel cylinder, bad master cylinder, contaminated brake fluid, or worn brake pads. Start with thorough bleeding, then inspect components if problem persists. Soft pedal should never be ignored as it indicates safety issue.
For Budget-Conscious Builders:
- Front disc brake conversion only ($800-$1,200)
- Keep rear drums functional and properly adjusted
- Install proportioning valve for balance
- Use power brake booster if possible
- Quality budget kit adequate for street cruising
- Save rear conversion for later upgrade
- Delivers 80% of benefit at 50% of cost
For Street/Strip Hot Rods:
- Front disc brake conversion ($1,200-$1,800)
- Rear disc brake conversion ($800-$1,200)
- Adjustable proportioning valve for tuning
- Power brakes for consistent performance
- Vented rotors front for heat dissipation
- Performance pad compound for hard stops
- Complete four-wheel disc provides confidence
For Pro-Touring Builds:
- Premium front disc kit ($1,800-$2,500)
- Premium rear disc kit ($1,400-$1,800)
- Multi-piston calipers front and rear
- Large diameter vented rotors
- Adjustable proportioning valve
- High-performance brake pads
- Stainless braided brake lines
- Power brake booster (hydro-boost if needed)
Universal Principles:
- Never compromise on brake system quality or safety
- Use matched components for best performance
- Install proportioning valve for disc/drum combos
- Replace all flexible brake hoses during conversion
- Bleed system thoroughly until firm pedal
- Test brakes extensively before normal driving
- Follow kit instructions precisely
- Maintain brake system regularly
- Bed in new pads properly (30-50 moderate stops)
- Keep brake fluid fresh (replace every 2 years)
Disc brake conversions dramatically improve hot rod safety, performance, and driving confidence. Whether you choose budget-friendly front-only conversion or complete four-wheel disc system, proper component selection and installation creates reliable stopping power for modern driving conditions. Take time to select quality components, install correctly, and maintain properly for years of confident braking performance.
This guide is provided for educational purposes. Brake system modifications affect vehicle safety. Always follow proper installation procedures and manufacturer specifications. Improper brake work can create dangerous driving conditions. When in doubt, consult experienced professionals for guidance on safety-critical brake system modifications.